
| Version 37 (modified by , 4 years ago) ( diff ) |
|---|
Table of Contents
Working with USRP2 - Universal Software Radio Peripheral
Description
In this tutorial we'll use the 2 USRPs on Sandbox 3 to transmit and receive a single frequency over the air to demonstrate the use of Universal software Radio peripheral Hardware Drivers (UHD) which is used standalone to configure and enable the USRPs. This tutorial can be run on other USRP2s available of the grid as well. For details on available USRPs on the grid, please see available USRP hardware in the grid.
Hardware / Software Resources utilized
- Sandbox 3 - consists of two nodes (node1-1 & node1-2). Each node has a USRP2 connect via Ethernet.
- baseline-sdr.ndz: disk image loaded onto nodes. This image has all the precompiled - software required to configure the USRPs and analyze recorded data. The USRP2's interface with the node is already configured.
- omf: used to image to nodes
- octave: GNU version of MATLAB
Set up
- Before you can access the testbed, you need to make a reservation and get it approved by the reservation service. After receiving the reservation's confirmation (approval) email:
Login into reserved domain: ssh username@sb3.orbit-lab.org
Login into reserved domain
During your approved time slot, you will be able to ssh into the console of the respective domain. A console is a dedicated machine that allows access to all resources in that domain.
For example, to access the sandbox1:
yourhost>ssh username@console.sb1.orbit-lab.org

Using username "username".
Authenticating with public key "xxxxxxxxx"
Welcome to Ubuntu 12.04.1 LTS (GNU/Linux 3.2.0-36-generic x86_64)

 * Documentation:  https://help.ubuntu.com/

  System information as of Mon Jan 28 20:25:50 EST 2013

  System load:  0.0               Processes:           93
  Usage of /:   2.7% of 69.43GB   Users logged in:     0
  Memory usage: 6%                IP address for eth0: 10.50.18.10
  Swap usage:   0%                IP address for eth1: 10.18.0.10

  Graph this data and manage this system at https://landscape.canonical.com/

9 packages can be updated.
0 updates are security updates.

|-----------------------------------------------------------------|
|                 *** For authorized use only ***                 |
| This system is for the use of authorized users only.  All users |
| are expected to comply with the "Acceptable Use Policy" availa- |
| ble at http://www.orbit-lab.org/AUP.html                        |
| Individuals using this computer system, are subject to having   |
| all of their activities on this system monitored and recorded   |
| by system personnel.                                            |
|                                                                 |
| Anyone using this system expressly consents to such monitoring  |
| and is advised that if such monitoring reveals possible         |
| evidence of criminal activity, system personnel may provide the |
| evidence of such monitoring to law enforcement officials.       |
|                                                                 |
| Email question, comments or problems to help@orbit-lab.org      |
|-----------------------------------------------------------------|

username@console.sb1:~$
Load an image on the nodes: omf load -i baseline-sdr.ndz -t system:topo:all
Load an Image
- Before we begin using the nodes, it's a good idea to check their status first. This is done with the omf stat command.
omf stat
This omf command is used to display the power status of the node/domain.
Usage: omf stat
username@consoles.outdoor:omf stat
Returns the status of the nodes in a testbed
Usage:
      omf-5.4 stat [-h] [-s] [-t TOPOLOGY] [-c AGGREGATE]

      With:
      -h, --help                print this help message
      -s, --summary             print a summary of the node status for the testbed
      -c, --config AGGREGATE    use testbed AGGREGATE
      -t, --topology TOPOLOGY   a valid topology file or description (defaults to 'system:topo:all')

      Some Examples:
                    omf-5.4 stat
                    omf-5.4 stat -s
                    omf-5.4 stat -t omf.nicta.node1,omf.nicta.node2 -c sb1
                    omf-5.4 stat -t system:topo:all -c grid
Individual nodes are identified in the output of stat command by their fully qualified domain name (FQDN). This establishes their "coordinates" and the "domain" to which they belong. Nodes in different domains typically can NOT see each other. Node can be in 1 of 3 states:
POWEROFF Node is Available for use but turned off POWERON Node is Available and is on NOT REGISTERED Node is not Available for use Example: omf stat on the outdoor domain
user@console.outdoor:~# omf stat -t all

 INFO NodeHandler: OMF Experiment Controller 5.4 (git 6d34264)
 INFO NodeHandler: Slice ID: default_slice (default)
 INFO NodeHandler: Experiment ID: default_slice-2012-10-14t14.42.15-04.00
 INFO NodeHandler: Message authentication is disabled
 INFO Experiment: load system:exp:stdlib
 INFO property.resetDelay: value = 210 (Fixnum)
 INFO property.resetTries: value = 1 (Fixnum)
 INFO Experiment: load system:exp:eventlib
 INFO Experiment: load system:exp:stat
 INFO Topology: Loading topology ''.
 INFO property.nodes: value = "system:topo:all" (String)
 INFO property.summary: value = false (FalseClass)
 INFO Topology: Loading topology 'system:topo:all'.
 Talking to the CMC service, please wait
-----------------------------------------------
 Domain: outdoor.orbit-lab.org
 Node: node3-6.outdoor.orbit-lab.org   	 State: NOT REGISTERED
 Node: node3-3.outdoor.orbit-lab.org   	 State: POWEROFF
 Node: node2-10.outdoor.orbit-lab.org    State: POWEROFF
 Node: node1-10.outdoor.orbit-lab.org    State: POWEROFF
 Node: node1-8.outdoor.orbit-lab.org   	 State: POWERON
 Node: node1-6.outdoor.orbit-lab.org   	 State: POWERON
 Node: node3-2.outdoor.orbit-lab.org   	 State: POWEROFF
 Node: node3-1.outdoor.orbit-lab.org   	 State: POWEROFF
 Node: node1-3.outdoor.orbit-lab.org   	 State: POWERON
 Node: node3-5.outdoor.orbit-lab.org   	 State: POWEROFF
 Node: node2-5.outdoor.orbit-lab.org   	 State: NOT REGISTERED
 Node: node1-2.outdoor.orbit-lab.org   	 State: POWERON
-----------------------------------------------
 INFO Experiment: Switching ON resources which are OFF
 INFO EXPERIMENT_DONE: Event triggered. Starting the associated tasks.
 INFO NodeHandler:
 INFO NodeHandler: Shutting down experiment, please wait...
 INFO NodeHandler:
 INFO run: Experiment default_slice-2012-10-14t14.42.15-04.00 finished after 0:6
- It is recommended that the node be in the POWEROFF state prior to any experiment process. If the node is in the POWERON state you can use the omf tell command to get the node into the off state.
omf tell
OMF command to control the power state/reset the nodes.
Usage: omf tell
user@console:omf tell
Switch ON/OFF and reboot the nodes in a testbed
Usage:
      omf tell [-h] -t TOPOLOGY -a ACTION [-c AGGREGATE]

      With:
      -h, --help           print this help message

      -a, --action ACTION  specify an action
      ACTION:
      on              turn node(s) ON
      offs            turn node(s) OFF (soft)
      offh            turn node(s) OFF (hard)
      reboot          reboots node(s) (soft)
      reset           resets node(s) (hard)

      -h, --help                print this help message
      -t, --topology TOPOLOGY   a valid topology file or description (MANDATORY)
      -c, --config AGGREGATE    use testbed AGGREGATE

      Some Examples:
                    omf tell -a reset -t node1-1.grid.orbit-lab.org
                    omf tell -a on -t system:topo:all -c grid
                    omf tell -a reboot -t node1-1
                    omf tell -a offh -t [1..2,1..5]
                    omf tell -a offh -t system:topo:all
                    omf tell -a reset -t system:topo:imaged
The commands are: on, offh (equivalent to pulling out the power cord), offs (software shutdown), reboot (software reboot) and reset (hardware reset).
Example: turn off node1-1 on the outdoor domain
user@console.outdoor:~# omf tell -a offh -t node1-1

 INFO NodeHandler: OMF Experiment Controller 5.4 (git 3fb37b9)
 INFO NodeHandler: Reading configuration file /etc/omf-expctl-5.4/services.yaml
 INFO NodeHandler: Add domain http - http://internal1.orbit-lab.org:5054/
 INFO NodeHandler: Add domain http - http://repository1.orbit-lab.org:5054/
 INFO NodeHandler: Slice ID: default_slice (default)
 INFO NodeHandler: Experiment ID: default_slice-2014-09-30t00.24.28.504-04.00
 INFO NodeHandler: Message authentication is disabled
 INFO Experiment: load system:exp:stdlib
 INFO property.resetDelay: resetDelay = 230 (Fixnum)
 INFO property.resetTries: resetTries = 1 (Fixnum)
 INFO Experiment: load system:exp:eventlib
 INFO Experiment: load system:exp:winlib
 INFO Experiment: load system:exp:tell
 INFO property.nodes: nodes = "node1-1" (String)
 INFO property.command: command = "offh" (String)

Talking to the CMC service, please wait
-----------------------------------------------
 Node: node1-1.outdoor.orbit-lab.org   	 Reply: OK
-----------------------------------------------

 INFO EXPERIMENT_DONE: Event triggered. Starting the associated tasks.
 INFO NodeHandler:
 INFO NodeHandler: Shutting down experiment, please wait...
 INFO NodeHandler:
 INFO run: Experiment default_slice-2014-09-30t00.24.28.504-04.00 finished after 0:10
- Once node set is on an POWEROFF state, load an image with omf load command
omf load
Load command is used to put an image onto the hard disk of the node.
Usage: omf load
Install a given disk image on the nodes in a testbed
Usage:
      omf-5.4 load [-h] [-i IMAGE_PATH] [-o TIMEOUT] [-t TOPOLOGY] [-c AGGREGATE]

      With:
      -h, --help                print this help message
      -c, --config AGGREGATE    use testbed AGGREGATE
      -t, --topology TOPOLOGY   a valid topology file or description (defaults to 'system:topo:all')
                                (if a file 'TOPOLOGY' doesn't exist, interpret it as a comma-separated list of nodes)
      -i, --image IMAGE         disk image to load
                                (default is 'baseline.ndz', the latest stable baseline image)
      -o, --timeout TIMEOUT     a duration (in sec.) after which imageNodes should stop waiting for
                                nodes that have not finished their image installation
                                (default is 800 sec, i.e. 13min 20sec)
          --outpath PATH        Path where the resulting Topologies should be saved
                                (default is '/tmp')
          --outprefix PREFIX    Prefix to use for naming the resulting Topologies
                                (default is your experiment ID)

      Some Examples:
                    omf-5.4 load
                    omf-5.4 load -t system:topo:all -i baseline-2.4.ndz
                    omf-5.4 load -t omf.nicta.node1 -i wireless-2.6.ndz
                    omf-5.4 load -t omf.nicta.node1,omf.nicta.node2 -i baseline.ndz -o 400
                    omf-5.4 load -t system:topo:circle -i my_Own_Image.ndz
                    omf-5.4 load -t my_Own_Topology -i baseline-2.2.ndz -t 600 -c grid
                    omf-5.4 load -t my_Own_Topology --outpath ./ --outprefix my_Own_Prefix
Two important arguments are TOPOLOGY describing the set of nodes one wishes to image , and !IMAGE specifying the name of the image one wants to load the nodes with. If the imaging process does not does not finish within the default timeout period, that period can be increase by using the -o flag (e.g. -o 1600). Typical command to load both nodes of sandbox 1 with the baseline image would look like:
If the node is in the NOT REGISTERED state, you may need to wait for it to recover the POWEROFF state (it some times requires a few moments for the services to sync up). If the node takes more than 60 seconds to come out of the NODE NOT AVAILABLE state please report it to an administrator.Example: omf load-i baseline.ndz -t node1-1
username@console.sb3:~$ omf load -i baseline.ndz -t node1-1

DEBUG FQDN:console.sb3.orbit-lab.org:
 INFO NodeHandler: OMF Experiment Controller 5.4 (git 861d645)
 INFO NodeHandler: Reading configuration file /etc/omf-expctl-5.4/services.yaml
 INFO NodeHandler: Add domain http - http://internal1.orbit-lab.org:5054/
 INFO NodeHandler: Add domain http - http://repository1.orbit-lab.org:5054/
 INFO NodeHandler: Add domain http - http://external1.orbit-lab.org:5054/
 INFO NodeHandler: Slice ID: pxe_slice
 INFO NodeHandler: Experiment ID: pxe_slice-2018-08-08t13.41.37.814-04.00
 INFO NodeHandler: Message authentication is disabled
 INFO Experiment: load system:exp:stdlib
 INFO property.resetDelay: resetDelay = 230 (Fixnum)
 INFO property.resetTries: resetTries = 1 (Fixnum)
 INFO Experiment: load system:exp:eventlib
 INFO Experiment: load system:exp:winlib
 INFO Experiment: load system:exp:imageNode
 INFO property.nodes: nodes = "node1-1" (String)
 INFO property.image: image = "baseline.ndz" (String)
 INFO property.domain: domain = "sb3.orbit-lab.org" (String)
 INFO property.outpath: outpath = "/tmp" (String)
 INFO property.outprefix: outprefix = "pxe_slice-2018-08-08t13.41.37.814-04.00" (String)
 INFO property.timeout: timeout = 800 (Fixnum)
 INFO property.resize: resize = nil (NilClass)
 INFO Topology: Loaded topology 'system:topo:registered'.
 INFO property.resetDelay: resetDelay = 100 (Fixnum)
 INFO Experiment: Resetting resources
 INFO stdlib: Waiting for nodes (Up/Down/Total): 0/1/1 - (still down: node1-1.sb3.orbit-lab.org) [0 sec.]
 INFO stdlib: Waiting for nodes (Up/Down/Total): 0/1/1 - (still down: node1-1.sb3.orbit-lab.org) [10 sec.]
 INFO stdlib: Waiting for nodes (Up/Down/Total): 0/1/1 - (still down: node1-1.sb3.orbit-lab.org) [20 sec.]
 INFO stdlib: Waiting for nodes (Up/Down/Total): 0/1/1 - (still down: node1-1.sb3.orbit-lab.org) [30 sec.]
 INFO stdlib: Waiting for nodes (Up/Down/Total): 0/1/1 - (still down: node1-1.sb3.orbit-lab.org) [40 sec.]
 INFO stdlib: Waiting for nodes (Up/Down/Total): 0/1/1 - (still down: node1-1.sb3.orbit-lab.org) [50 sec.]
 INFO exp: Progress(0/0/1): 0/0/0 min(node1-1.sb3.orbit-lab.org)/avg/max (59) - Timeout: 790 sec.
 INFO ALL_UP: Event triggered. Starting the associated tasks.
 INFO BRING_UP: Event triggered. Starting the associated tasks.
 INFO Experiment: Bringing up resources
 INFO exp: Progress(0/0/1): 50/50/50 min(node1-1.sb3.orbit-lab.org)/avg/max (59) - Timeout: 780 sec.
 INFO exp: Progress(0/0/1): 80/80/80 min(node1-1.sb3.orbit-lab.org)/avg/max (59) - Timeout: 770 sec.
 INFO exp: Progress(1/0/1): 100/100/100 min()/avg/max (59) - Timeout: 760 sec.
 INFO exp:  -----------------------------
 INFO exp:  Imaging Process Done
 INFO exp:  1 node successfully imaged - Topology saved in '/tmp/pxe_slice-2018-08-08t13.41.37.814-04.00-topo-success.rb'
 INFO exp:  -----------------------------
 INFO EXPERIMENT_DONE: Event triggered. Starting the associated tasks.
 INFO NodeHandler:
 INFO NodeHandler: Shutting down experiment, please wait...
 INFO NodeHandler:
 INFO NodeHandler: Shutdown flag is set - Turning Off the resources
 INFO run: Experiment pxe_slice-2018-08-08t13.41.37.814-04.00 finished after 1:44
- Before we begin using the nodes, it's a good idea to check their status first. This is done with the omf stat command.
Turn on the nodes: omf tell -a on -t all
Turn the Nodes ON
To turn the nodes on use omf tell command:
omf tell
OMF command to control the power state/reset the nodes.
Usage: omf tell
user@console:omf tell
Switch ON/OFF and reboot the nodes in a testbed
Usage:
      omf tell [-h] -t TOPOLOGY -a ACTION [-c AGGREGATE]

      With:
      -h, --help           print this help message

      -a, --action ACTION  specify an action
      ACTION:
      on              turn node(s) ON
      offs            turn node(s) OFF (soft)
      offh            turn node(s) OFF (hard)
      reboot          reboots node(s) (soft)
      reset           resets node(s) (hard)

      -h, --help                print this help message
      -t, --topology TOPOLOGY   a valid topology file or description (MANDATORY)
      -c, --config AGGREGATE    use testbed AGGREGATE

      Some Examples:
                    omf tell -a reset -t node1-1.grid.orbit-lab.org
                    omf tell -a on -t system:topo:all -c grid
                    omf tell -a reboot -t node1-1
                    omf tell -a offh -t [1..2,1..5]
                    omf tell -a offh -t system:topo:all
                    omf tell -a reset -t system:topo:imaged
The commands are: on, offh (equivalent to pulling out the power cord), offs (software shutdown), reboot (software reboot) and reset (hardware reset).
Example: turn off node1-1 on the outdoor domain
user@console.outdoor:~# omf tell -a offh -t node1-1

 INFO NodeHandler: OMF Experiment Controller 5.4 (git 3fb37b9)
 INFO NodeHandler: Reading configuration file /etc/omf-expctl-5.4/services.yaml
 INFO NodeHandler: Add domain http - http://internal1.orbit-lab.org:5054/
 INFO NodeHandler: Add domain http - http://repository1.orbit-lab.org:5054/
 INFO NodeHandler: Slice ID: default_slice (default)
 INFO NodeHandler: Experiment ID: default_slice-2014-09-30t00.24.28.504-04.00
 INFO NodeHandler: Message authentication is disabled
 INFO Experiment: load system:exp:stdlib
 INFO property.resetDelay: resetDelay = 230 (Fixnum)
 INFO property.resetTries: resetTries = 1 (Fixnum)
 INFO Experiment: load system:exp:eventlib
 INFO Experiment: load system:exp:winlib
 INFO Experiment: load system:exp:tell
 INFO property.nodes: nodes = "node1-1" (String)
 INFO property.command: command = "offh" (String)

Talking to the CMC service, please wait
-----------------------------------------------
 Node: node1-1.outdoor.orbit-lab.org   	 Reply: OK
-----------------------------------------------

 INFO EXPERIMENT_DONE: Event triggered. Starting the associated tasks.
 INFO NodeHandler:
 INFO NodeHandler: Shutting down experiment, please wait...
 INFO NodeHandler:
 INFO run: Experiment default_slice-2014-09-30t00.24.28.504-04.00 finished after 0:10
Usage
- Once the nodes are imaged, open a separate SSH session to each node. Use the USRP2 on node1-1 as the transmitter and USRP2 on node1-2 as receiver.
SSH into node1-1 from the sb3 console:
username@console.sb3:~$ ssh root@node1-1
Add the following lines to
/etc/netplan/00-netplan.yamlenp4s0: dhcp4: false addresses: [192.168.10.1/24]Apply the new configuration
root@node1-1:~# netplan apply
Go to the UHD examples folder:
root@node1-1:~# cd uhd/host/build/examples/or
root@node1-1:~# cd /usr/local/lib/uhd/examples/
SSH into node1-2 from the sb3 console:
username@console.sb3:~$ ssh root@node1-2
Add the following lines to
/etc/netplan/00-netplan.yamlenp4s0: dhcp4: false addresses: [192.168.10.1/24]Apply the new configuration
root@node1-2:~# netplan apply
Go to the UHD examples folder:
root@node1-2:~# cd uhd/host/build/examples/or
root@node1-2:~# cd /usr/local/lib/uhd/examples/
- The directory content should look like the following in both nodes
root@node1-1:~/uhd/host/build/examples# ls
benchmark_rate       latency_test      rx_samples_to_file  test_pps_input        tx_waveforms
CMakeFiles           Makefile          rx_samples_to_udp   tx_bursts
cmake_install.cmake  network_relay     rx_timed_samples    tx_samples_from_file
CTestTestfile.cmake  rx_multi_samples  test_messages       tx_timed_samples
- Once inside the node verify that the node can talk to the USRP
root@node1-1:~/uhd/host/build/examples# uhd_find_devices
- It should return something like the following:
root@node1-1:~/uhd/host/build/examples# uhd_find_devices
linux; GNU C++ version 4.8.4; Boost_105500; UHD_003.009.001-0-unknown

--------------------------------------------------
-- UHD Device 0
--------------------------------------------------
Device Address:
    type: usrp2
    addr: 192.168.10.2
    name:
    serial: F297B6
- Probe the device
root@node1-1:~/uhd/host/build/examples# uhd_usrp_probe
linux; GNU C++ version 4.8.4; Boost_105500; UHD_003.009.001-0-unknown

-- Opening a USRP2/N-Series device...
-- Current recv frame size: 1472 bytes
-- Current send frame size: 1472 bytes
  _____________________________________________________
 /
|       Device: USRP2 / N-Series Device
|     _____________________________________________________
|    /
|   |       Mboard: N210r4
|   |   hardware: 2577
|   |   mac-addr: 00:80:2f:0a:cc:db
|   |   ip-addr: 192.168.10.2
|   |   subnet: 255.255.255.255
|   |   gateway: 255.255.255.255
|   |   gpsdo: none
|   |   serial: F297B6
|   |   FW Version: 12.4
|   |   FPGA Version: 11.1
|   |
|   |   Time sources: none, external, _external_, mimo
|   |   Clock sources: internal, external, mimo
|   |   Sensors: mimo_locked, ref_locked
|   |     _____________________________________________________
|   |    /
|   |   |       RX DSP: 0
|   |   |   Freq range: -50.000 to 50.000 MHz
|   |     _____________________________________________________
|   |    /
|   |   |       RX DSP: 1
|   |   |   Freq range: -50.000 to 50.000 MHz
|   |     _____________________________________________________
|   |    /
|   |   |       RX Dboard: A
|   |   |   ID: SBX (0x0054)
|   |   |   Serial: E5R1CSBXS
|   |   |     _____________________________________________________
|   |   |    /
|   |   |   |       RX Frontend: 0
|   |   |   |   Name: SBXv3 RX
|   |   |   |   Antennas: TX/RX, RX2, CAL
|   |   |   |   Sensors: lo_locked
|   |   |   |   Freq range: 400.000 to 4400.000 MHz
|   |   |   |   Gain range PGA0: 0.0 to 31.5 step 0.5 dB
|   |   |   |   Bandwidth range: 40000000.0 to 40000000.0 step 0.0 Hz
|   |   |   |   Connection Type: IQ
|   |   |   |   Uses LO offset: No
|   |   |     _____________________________________________________
|   |   |    /
|   |   |   |       RX Codec: A
|   |   |   |   Name: ads62p44
|   |   |   |   Gain range digital: 0.0 to 6.0 step 0.5 dB
|   |   |   |   Gain range fine: 0.0 to 0.5 step 0.1 dB
|   |     _____________________________________________________
|   |    /
|   |   |       TX DSP: 0
|   |   |   Freq range: -50.000 to 50.000 MHz
|   |     _____________________________________________________
|   |    /
|   |   |       TX Dboard: A
|   |   |   ID: SBX (0x0055)
|   |   |   Serial: E5R1CSBXS
|   |   |     _____________________________________________________
|   |   |    /
|   |   |   |       TX Frontend: 0
|   |   |   |   Name: SBXv3 TX
|   |   |   |   Antennas: TX/RX, CAL
|   |   |   |   Sensors: lo_locked
|   |   |   |   Freq range: 400.000 to 4400.000 MHz
|   |   |   |   Gain range PGA0: 0.0 to 31.5 step 0.5 dB
|   |   |   |   Bandwidth range: 40000000.0 to 40000000.0 step 0.0 Hz
|   |   |   |   Connection Type: QI
|   |   |   |   Uses LO offset: No
|   |   |     _____________________________________________________
|   |   |    /
|   |   |   |       TX Codec: A
|   |   |   |   Name: ad9777
|   |   |   |   Gain Elements: None
If the commands uhd_find_devices & uhd_usrp_probe return No UHD Devices Found, please refer to the troubleshooting section.
- On node1-1 use the waveform generator to continuously transmit a single frequency sine wave with a frequency of 1MHz sampled at a rate of 5 MSamples / second and modulated to 1800MHz
root@node1-1:~/uhd/host/build/examples# ./tx_waveforms --wave-freq 1e6 --wave-type SINE --freq 1800e6 --rate 5e6 --gain 10 --ampl 0.2
linux; GNU C++ version 4.8.4; Boost_105500; UHD_003.009.001-0-unknown


Creating the usrp device with: ...
-- Opening a USRP2/N-Series device...
-- Current recv frame size: 1472 bytes
-- Current send frame size: 1472 bytes
Using Device: Single USRP:
  Device: USRP2 / N-Series Device
  Mboard 0: N210r4
  RX Channel: 0
    RX DSP: 0
    RX Dboard: A
    RX Subdev: SBXv3 RX
  TX Channel: 0
    TX DSP: 0
    TX Dboard: A
    TX Subdev: SBXv3 TX

Setting TX Rate: 5.000000 Msps...
Actual TX Rate: 5.000000 Msps...

Setting TX Freq: 1800.000000 MHz...
Actual TX Freq: 1800.000000 MHz...

Setting TX Gain: 10.000000 dB...
Actual TX Gain: 10.000000 dB...

Setting device timestamp to 0...
Checking TX: LO: locked ...
Press Ctrl + C to stop streaming...
- Now set up the USRP2 on node1-2 to sniff the spectrum at 1800MHz using the rx_ascii_art_dft tool
root@node1-2:~/uhd/host/build/examples# ./rx_ascii_art_dft --freq 1800e6 --gain 10 --rate 5e6 --frame-rate 10 --ref-lvl -30 --dyn-rng 70
- The output should display a frequency spectrum in the terminal using the ascii art! This plot is showing a peak at 1800MHz. Note that this peak is composed of the carrier which is centered at 1800 MHz and the sine waveform at 1800 MHz + 1MHz.
                                                                                                                                       :
                                                                                                                                       |
                                                                                                                                      :|
-40                                                                                                                                   ||
                                                                                                                                      ||
                                                                                                                                      ||
                                                                                                                                      ||
                                                                                                                                      ||
                                                                                                  |                                   ||!
-60                                                          !|                                   |                                   |||
                                                             ||                                   |                                   |||
                                                             ||                                   |                                   |||
                                                             ||                                   |!                                  |||
                                                             ||                                   ||                                 !|||:
                                                             ||                                   ||                                .|||||
                                                             ||!                                  ||                                ||||||
-80                                                          |||                                 !||                                ||||||
                                                             |||                                 |||                                ||||||!
                                                             |||                                 |||       .                        |||||||
                                                             |||                   .   !|     :  |||:  :   |          .|          !!||||||||
                        .   !    :   .          .            |||    |              |. .||| :  | ||||| :|!!.|.       . ||.  |.  !  |||||||||||           .!
           ||!!|:     : |   |   :|:  |     : .  |   : !|!   :|||    || . :|!   :.|!||:||||.| !| |||||.|||||||  .  ::| |||  ||::|!!|||||||||||!.  : :|   ||:|     .  | .!      :! .||   . .
-100   .!| ||||||| : !|!|!. |   ||||:||  . |!| .|.:.|.|||  !||||  : ||.|:||| |!|||||||||||||:|| ||||||||||||| !|| |||.|||:||||||||||||||||||||| ||||| |!|||||  ! | :|:||| :!||||||||:  | |:
 dBfs                1798MHz           1798.5MHz          1799MHz          1799.5MHz           1800MHz          1800.5MHz          1801MHz          1801.5MHz           1802MHz
- Now going back to node1-1, turn off the waveform generator so nothing is transmitted. That is do a ctrl-c in the node1-1 terminal. The frequency spectrum display on node1-2 should display the noise floor
-40


-60


                                                                                                  .
                                                                                                  |
-80                                                                                               |
                                                                                                 ||
                                                                                            :   .||:
                             :                                            .      |!        || ..||||.  .   ..
                             ||.    . |      ..      | ..                .|.    .||      . ||!|||||||  || |||!..       . .    :|:|  ! !   .!      ..:  !|| |:    :|:     . :
        |!          ..       ||| |.:| |.   . ||   .!!| ||   .! .|      : |||    ||||.||::| ||||||||||:.|| |||||| |  !|:|.|: |:||||  | |:  ||      ||| !|||!|| |! |||.    | |:      !  .
-100   :||!.|:   .||||  .. !:||| ||||!||.! | ||  !|||||||   |||||| .  || ||| !  |||||||||| |||||||||||||||||||||||  ||||||| ||||||!|| ||::||!.!  .||| ||||||| || |||||   ||||   . || ||. !! !:
 dBfs                1798MHz           1798.5MHz          1799MHz          1799.5MHz           1800MHz          1800.5MHz          1801MHz          1801.5MHz           1802MHz
- Now generate a 500 kHz ramp (ie. sawtooth) waveform with the carrier centered at 1800 MHz.
root@node1-1:~/uhd/host/build/examples# ./tx_waveforms --wave-freq 500e3 --wave-type RAMP --freq 1800e6 --rate 5e6 --gain 5 --ampl 0.1
- Multiple peaks separated by 500 kHz should be present in the frequency spectrum of the receiving node. The peaks correspond to the spectral characteristics of the saw tooth waveform.
-40


                                                                                                                    :
                                                                                                                    |!
                                                                                                                    ||
-60                                        .                 :|                                   :                 ||
                                           |                 ||                                   |                 ||                 |                                    .
                                           |!                ||                                   |                 ||                :|                                   ||
                         .                 ||                ||                                   |                 ||                ||                 |!                ||
      .                  |                 ||                |||               :!                 |                 ||                ||                 ||                ||
      ||                 ||               !||                |||               |||               .||                ||                ||                .||                ||
      ||                :||               |||               .|||               |||               |||               !||                ||!               |||                ||:               :
-80   ||               .|||              .|||!              ||||.             :|||!              |||:              ||||              :|||               |||:              !|||               |
      ||.              |||||             |||||             .|||||             |||||!            ||||||            !||||!            .|||||:            |||||..            ||||               |
      |||             !||||||. ..      . ||||||.       : .:||||||.:        : !||||||:.        !|||||||.   .      ||||||||   !    :::|||||||.       .  !|||||||:         !|||||!.             |
      |||:           !||||||||!||     ||!||||||| : .:..| ||||||||||.   : :!|||||||||||    .:::|||||||||!! ||!|!!|||||||||.:||  :||||||||||||.:.|. .| :|||||||||!!|.|  !|||||||||!           !|
      ||||.!:   ..|:.||||||||||||.!|!:||||||||||||||||||||||||||||||!.!|||||||||||||||.:::|||||||||||||||.|||||||||||||||||||!!||||||||||||||||||!||:|||||||||||||||.:|||||||||||!|.      :!||
      |||||||:||||||||||||||||||||||||||||||||||||||||||||||||||||||||||||||||||||||||||||||||||||||||||||||||||||||||||||||||||||||||||||||||||||||||||||||||||||||||||||||||||||||:!: |.||||
-100  |||||||||||||||||||||||||||||||||||||||||||||||||||||||||||||||||||||||||||||||||||||||||||||||||||||||||||||||||||||||||||||||||||||||||||||||||||||||||||||||||||||||||||||||||:||||||
 dBfs                1798MHz           1798.5MHz          1799MHz          1799.5MHz           1800MHz          1800.5MHz          1801MHz          1801.5MHz           1802MHz
- Play around with the options on tx_waveforms - vary the tx_waveforms amplitude (—ampl option) and the waveform frequency (—wave-freq); verify the corresponding change in the received frequency spectrum. To view all options do the following:
root@node1-1:~/uhd/host/build/examples# ./tx_waveforms --help
Capture waveform and record to file & add time-domain plot of waveform
- Now record the received signal to an OCTAVE / MATLAB file.
From node1-1 transmit a waveform with the following attributes
root@node1-1:~/uhd/host/build/examples# ./tx_waveforms --wave-freq 1e6 --wave-type SINE --freq 1800e6 --rate 5e6 --ampl 0.5
- On node1-2, use the rx_sample_to_file utility to dump the received samples into a file.
root@node1-2:~/uhd/host/build/examples# ./rx_samples_to_file --freq 1800e6 --rate 5e6 --type float
- The samples will be recorded into the file usrp_samples.dat. Upload this file into octave and plot the time-domain samples.
On node1-2, start up octave
root@node1-2:~/uhd/host/build/examples# octave
GNU Octave, version 3.8.1
Copyright (C) 2014 John W. Eaton and others.
This is free software; see the source code for copying conditions.
There is ABSOLUTELY NO WARRANTY; not even for MERCHANTABILITY or
FITNESS FOR A PARTICULAR PURPOSE.  For details, type 'warranty'.

Octave was configured for "x86_64-pc-linux-gnu".

Additional information about Octave is available at http://www.octave.org.

Please contribute if you find this software useful.
For more information, visit http://www.octave.org/get-involved.html

Read http://www.octave.org/bugs.html to learn how to submit bug reports.
For information about changes from previous versions, type 'news'.

octave:1>
- From the Octave prompt verify received signal in the file. The function read_float_binary used below can be downloaded from the attachment.
octave:5> c=read_float_binary('usrp_samples.dat');
octave:6> creal = c([1:2:length(c)]);
octave:7> cimage = c([2:2:length(c)]);
octave:8> subplot(211) ; plot(creal(100:230)) ; title('real') ; axis([0 140 -0.010 0.010]) ;
octave:9> subplot(212) ; plot(cimage(100:230)) ; title('imag') ; axis([0 140 -0.010 0.010])
- An octave plot window displaying the sine wave should be similar to the following.
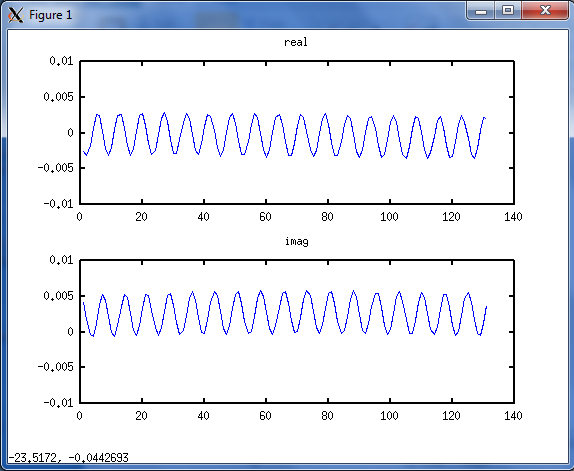
Plot of received sine wave

Troubleshooting
- uhd_find_devices & uhd_usrp_probe return No UHD Devices Found
If problems arise when trying find and probe the device, it's most likely the case that interface between the node and USRP2 needs to be reconfigured. In most scenarios, if finding the USRP2s fails it should return the following for uhd_find_devices
root@node1-1:~# uhd_find_devices
linux; GNU C++ version 4.8.4; Boost_105500; UHD_003.009.001-0-unknown

No UHD Devices Found
The USRP2 has an ethernet interface (ip address: 192.168.10.2) to the node's eth2 interface (ip address: 192.168.10.1). To verify the nodes interface configuration:
root@node1-1:~# ifconfig eth2
eth2      Link encap:Ethernet  HWaddr 00:03:1d:07:49:5c
          inet addr:192.168.10.1  Bcast:192.168.10.255  Mask:255.255.255.0
          inet6 addr: fe80::203:1dff:fe07:495c/64 Scope:Link
          UP BROADCAST RUNNING MULTICAST  MTU:1500  Metric:1
          RX packets:4 errors:0 dropped:0 overruns:0 frame:0
          TX packets:10 errors:0 dropped:0 overruns:0 carrier:0
          collisions:0 txqueuelen:1000
          RX bytes:370 (370.0 B)  TX bytes:862 (862.0 B)
          Interrupt:17 Memory:fdce0000-fdd00000
If the interface is not configured, then do then following:
root@node1-1:~# ifconfig eth2 192.168.10.1 netmask 255.255.255.0 up
The USRP2 ip-address is 192.168.10.2. Now try pinging the USRP2.
root@node1-1:~# ping 192.168.10.2
PING 192.168.10.2 (192.168.10.2) 56(84) bytes of data.
64 bytes from 192.168.10.2: icmp_req=1 ttl=32 time=1.04 ms
64 bytes from 192.168.10.2: icmp_req=2 ttl=32 time=1.00 ms
64 bytes from 192.168.10.2: icmp_req=3 ttl=32 time=1.04 ms
64 bytes from 192.168.10.2: icmp_req=4 ttl=32 time=1.05 ms
64 bytes from 192.168.10.2: icmp_req=5 ttl=32 time=1.04 ms
At this point the node and USRP2 are able to see each other. Now retry finding and probing the USRPs.
Attachments (2)
- SineWave1MHz.png (48.9 KB ) - added by 12 years ago.
- read_float_binary.m (1.2 KB ) - added by 11 years ago.
Download all attachments as: .zip