
Table of Contents
Software Description
As mentioned previously software for the CM3 is developed in the Paradigm C++ Pro programming environment, and uses the Lantronix XPort AR SDK. At the time of this documents writing the SDK being used was release v5.2.0.0 R21. The CM3 works completely independently from the host node, and as soon as power is applied the native Lantronix XPort AR functions, such as network connectivity, start and then the custom written CM software loads.
Files
The following is a list of the basic files that are in the SVN repository, and what functionality they contain:
CM3- Initialization of the CM3, XML configuration, and the main program which runs the two primary threadsCM3_CLI- Sets up the command line interface (CLI) structure, as well as defining the functions call-backs for each command in the CLICM3_COMMAND- There are the functions that actually execute the commands, whether they be called by XML or UDPCM3_HTTP- creates the XML pages and function call-backs to enable commands over httpCM3_I2C- Presently unused other than containing functions that read the hardware status and the 5V monitoring line, this should be done over I2C through the DS1780 chip, but I2C is non-operationalCM3_IDENTITYContains functions that query the identifying features of the CM and node, like location, IP address, MAC address, etc.
Initialization
Upon start-up the CM3 will fist contact broadcast over the network to discover the IP address that should belong to it. Assuming that the MAC address is already in DHCP, an IP address will be assigned to it, and from there the custom CM3 software takes over. Much of the configuration of the device is done through the XML configuration method.
The following are configured through XML:
- Serial line
- GPIOs
- Telnet ports
After XML configuration is completed the CM3 will populate the network information back into variables set up in software. This is because a lot of the network information is only available through the XML configuration file and so to recollect it each time you need it takes a long time. The CM3 then sets up the HTTP commands, which allow some basic functions of the CM3 to be executed over XML, and the custom command line interface for the CM3, as described in the Usage section.
Flashing Firmware
There are two primary methods to reflash a CM3, over the network and also through the serial port. This section will describe how to load new firmware onto the device using both methods. The latest 'known good image' can always be found on the SVN Repository
Flashing firmware over network
- open FTP session directly to the CM Lantronix device in terminal client
ftp xxx.xxx.xxx.xxx
- when prompted for the username and password enter the following
username: admin
password: PASS
- using the image taken from the SVN repository
REV_A_B_C.rom.gzput REV_A_B_C.rom.gz xport_ar.rom.gz
- The image must be sent to the Xpor AR named xport_ar.rom.gz, otherwise the device will not recognize it as new firmware and will not re-flash. Re-flashing the device will take a few minutes, it will reset itself and should come back online with no issues.
Flashing firmware over serial
Re-flashing as CM over the serial port should be done when the node is not accessible aver the network, it is a generally slower method than via FTP. Before you can recover the firmware over serial you will need to install Device Installer on your PC. Device Installer is free to download off the lantronix website, and can be found here. For this process to work correctly a straight (non-crossover) serial cable must be used.
Plug in serial cable, follow directions, apply power cable at end
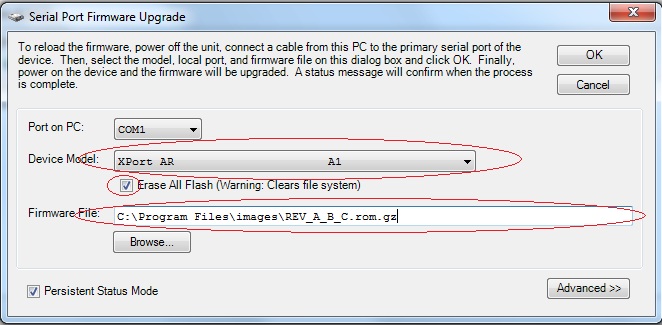
- Open
DeviceInstaller - Go to 'Tools'→'Advanced'→'Recover Firmware' (or simply the F8 key)
- Configure the options, and hit OK to load the image
- Choose the COM port being used
- Select "Xport AR A1" as the device
- Make sure that the "Erase all flash" option is checked
- Enter the path of the image to be loaded

- The program will prompt you to power off the device, you can just ignore this and hit next
- The serial recovery will have started, but you must still power cycle the device before the transfer begins, either hit the reset button on the CM or just pull and reapply the power to the CM.
Attachments (2)
- serial_recovery.jpg (74.8 KB ) - added by 13 years ago.
-
REV_4_2_0.rom.gz
(594.2 KB
) - added by 12 years ago.
CM3 firmware V4.1.0
Download all attachments as: .zip