
Go back —> Tutorials
Tutorial TOC
How to define and use multi-hop Topologies
Prerequisite
This feature is only available in NodeHandler v4 and above.
Before going through this tutorial, you should know the basics of writing and running an experiment script (see here and here).
You should also have installed a disk image with Node Agent v4 on the nodes of the testbed you are using (e.g. "baseline.ndz"). See How to install a disk image.
Goal
In this tutorial, you will learn how to define and use multi-hop topologies in your experiments.
As explained here, after installing an image on all the nodes of a testbed, 3 default topologies will be generated. One of them (system:topo:active) defines all the nodes that were correctly imaged. In other words, it contains a list of all nodes on the testbed that are currently working and have the requested disk image.
In this tutorial experiment, you will use this default active topology to create your own multi-hop topologies.
The tutorial experiment
This experiment is given in the attached script tut_topo_2.rb.
This file contains extensive comments that should help you understand the different steps involved in defining and using multi-hop topologies.
Since all nodes are more or less within each others 802.11 radio range in the current testbeds, this experiment is using a MAC address filtering tool to force given nodes to ignore other ones, thus emulating a multi-hop connectivity map.
There are currently three filtering tools to choose from: iptable, ebtable, and mackill. Before running this tutorial script, you have to make sure that the particular tool that you selected is indeed installed on the experiment nodes.
You can find more detailed information on the available commands to define topologies here.
To run this example script, use the following command:
omf exec tut_topo_2
The Results
The experiment screen output should then look like this. And the experiment log file should look like this.
You can also access the results of this particular experiment example in the MySQL database, using the experiment ID: "grid_2007_11_20_18_58_12" (please refer to this page for more information on accessing the results).
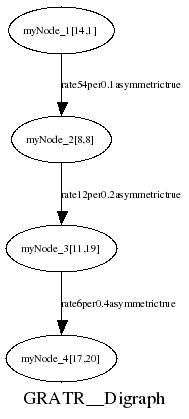
Finally, as explained in the tut_topo_2.rb script, you can optionally save a graph of your multi-hop topology into a file that should look like this (in .jpg and .dot displayed with a tool such as graphviz)
More…
ToDo - Put here a link to the AODV/OLSR tutorial when it will be ready.
Attachments (4)
- grid_2007_11_20_18_58_12-Graph.jpg (12.8 KB ) - added by 16 years ago.
- grid_2007_11_20_18_58_12-Output.txt (2.0 KB ) - added by 16 years ago.
- grid_2007_11_20_18_58_12.log (48.6 KB ) - added by 16 years ago.
- tut_topo_2.rb (7.6 KB ) - added by 16 years ago.
Download all attachments as: .zip