wiki:Tutorials/k0SDR/Tutorial17

Nutaq - PicoSDR start-up and configuration

Table of Contents

  1. SDR Tutorials
    1. Working with USRP2 - Universal Software Radio Peripheral
      1. Description
      2. Hardware / Software Resources utilized
      3. Set up
      4. Usage
      5. Capture waveform and record to file & add time-domain plot of waveform
      6. Troubleshooting
    1. Working with USRP X310
      1. Description
      2. Hardware / Software Resources Utilized
      3. Set Up
        1. Imaging
        2. Accessing the Nodes
        3. Configuring the Network Interface
        4. Setting up GNU Radio
      4. Building the GNU Radio Flowgraphs
        1. Transmitter
        2. Receiver
      5. Running the Experiment
      6. Troubleshooting
        1. xterm Executable Not Found
        2. FPGA Compatibility Mismatch
    1. Simple radio example with GNURADIO benchmark scripts
      1. Description
      2. Hardware / Software Resources utilized
      3. Set up
      4. Running GNU Radio benchmark scripts
      5. Outputs from transmitter and receiver
      6. Troubleshooting
    1. Simple radio example with GNURADIO benchmark scripts (OEDL)
      1. Description
      2. Hardware / Software Resources utilized
      3. Set up
      4. Running OEDL script and viewing results
      5. OEDL script
    1. OFDM radio example with GNURADIO benchmark scripts
      1. Description
      2. Hardware / Software Resources utilized
      3. Set up
      4. Running OEDL script
    1. Spectrum sensing with USRP2 and wiserd
      1. Description
      2. Hardware / Software Resources utilized
      3. Set up
      4. Generate signal source file using octave
      5. Set up transmitting node
      6. Set up receiving node(s)
    1. Spectrum sensing with USRP2 and wiserd (OEDL and OML)
      1. Description
      2. Hardware / Software Resources utilized
      3. Transmit predefined tone
      4. Record spectrum data to an OML file
      5. Performing the experiment using OEDL
    1. Transmitting wideband signals using USRP X310 and wiserd
      1. Description
      2. Transmitting a signal using wiserd
      3. Creating the signal
    1. Running DSC match script from the grid console
    1. Working with GNURadio and Nutaq ZeptoSDR
      1. Description
      2. Set up
      3. Run the GRC scripts
    1. Realtek 2832 EZCap - A Frugal SDR
      1. Prereqs
      2. A cheap spectrum analyzer
    1. MacSwitch (Obsolete)
      1. Prerequisites
      2. Start Mac Switch
    1. Zynq-based WISER platform - Start-up test
      1. Description
      2. Hardware / Software Resources utilized
      3. Set up
      4. Loading the Zedboard
      5. Running a start up test
    1. Zynq-based WISER platform - Spectrum Sensing
      1. Description
      2. Hardware / Software Resources utilized
      3. Set up
      4. Start spectrum sensing
    1. Zynq-based WISER platform - Spectrum sensing with multiple nodes (OEDL)
      1. Description
      2. Hardware / Software Resources utilized
      3. Spectrum sensing with an OEDL script
    1. Zynq-based WISER platform - Building the Firmware
      1. Description
      2. Getting the FPGA source code
      3. Building the FPGA design
      4. Building ARM core software
    1. Nutaq - PicoSDR start-up and configuration
      1. Description
      2. Set up
      3. Launch demo scripts
    1. Multi channel sample collection with x310
      1. Description
      2. Set up
      3. Collect samples
    1. Getting started with RFNoC X310
      1. Description
      2. Set up
      3. Find USRP X310s
      4. Program the FPGA
    1. Multi Channel Sample Processing & Visualization
      1. Hardware / software resources utilized
      2. Receive multi channel signal for processing and plotting
      3. Transmit a signal using a single usrp
    2. Plot the IQ Constellation of received signal
      1. Multi-channel Uhd STreamer (MUST)
      2. Description
      3. How it works (without going into the source-code :-D
      4. Source code & compilation
      5. Hardware interface application
      6. XML file
      7. Command server
      8. Usage Example
      9. Signal handler applications
      10. Tutorials
    1. Using two RFNoC streams simultaneously on a single USRP device
      1. Description
      2. Set Up
      3. Running the Simulation
    1. Using 2 transmit or 2 receive antennas simultaneously
      1. Description
      2. Set Up
      3. Running the Experiment
    1. Generate random transmissions emulating Primary Transmitters
      1. Description
      2. Set Up
      3. Running the Experiment
    1. RFNoC Spectrum Sensing
      1. Description
      2. Set Up
        1. Prepare Receive Node
        2. Prepare Receive USRPs
        3. Prepare Transmit Node
        4. Prepare Transmit USRP
        5. Set up SSH tunnel from your local port 5100 to grid.orbit-lab.org:5100
        6. Set up a web proxy for the receive node
      3. Run the experiment
    1. Full-Duplex Wireless using USRP N210
      1. Description
        1. Technical Report
        2. Updates
      2. Hardware / Software Resources Utilized
      3. Set Up
      4. Run the Experiments
      5. Example Experiment 1: A Real-Time Full-Duplex Radio with OFDM PHY (GNU …
      6. Example Experiment 2: A Simple Full-Duplex Radio Experiment (Terminal …
        1. In Terminal 1
          1. In Terminal 2 (SUB-20)
        2. A Secondary Transmitter Using Node13-8
        3. Acknowledgements
    1. LTE Traffic Trace Collection
      1. Description
      2. Setup OAI emulation framework
      3. Connecting UE to LTE network
      4. Connecting Multiple UEs
      5. Enabling OAI logging Module
      6. Application Design
      7. Running OAI using scripts
    1. Simple Radio Example with USRP X310 on ORBIT Sandbox 2
      1. Description
      2. Set Up
        1. Prepare the nodes
        2. Prepare network setup for USRP access
      3. Run the experiment
    1. Wideband Channel Sounding with USRP X310s
      1. Description
      2. Set Up
        1. Prepare Receive Node
        2. Prepare Receive USRPs
        3. Prepare Transmit Node
        4. Prepare Transmit USRP
        5. Set up SSH tunnel from your local port 5100 to grid.orbit-lab.org:5100
        6. Set up a web proxy for the receive node
      3. Run the experiment

Description

Demonstrate configuring PicoSDR and launching demo application that utilizes Perseus carrier board for RX/TX.

Set up

Before you can access the testbed, you need to make a reservation and get it approved by the reservation service. After receiving the reservation's confirmation (approval) email, load the ubuntu-14-04-64bit-sdr.ndz on the node. Once loading is finished turn the node on. For this example we'll use node1-12 which is a PicoSDR.

ssh username@grid.orbit-lab.org
omf load -i ubuntu-14-04-64bit-sdr.ndz -t node1-12
omf tell -a on -t node1-12

Once the node1-12 is up, ssh into the node1-12 (which is the PicoSDR's embedded PC) and configure the eth2 interface

ifconfig eth2 192.168.0.100 up

Verify connection to Perseus carrier board:

ping 192.168.0.101

Use a command line interface to load the Perseus carrier board with an FPGA bitsteam - for this example we'll use the "/opt/Nutaq/ADP6/ADP_MicroTCA/sdk/fpga/bin/GNURadio_Radio420_PCIe_sx315.bit":

cd /opt/Nutaq/ADP6/ADP_MicroTCA/sdk/bin
python adp_cli.py
connect 192.168.0.101
fpgaflash 1 ‘/opt/Nutaq/ADP6/ADP_MicroTCA/sdk/fpga/bin/GNURadio_Radio420_PCIe_sx315.bit’
reboot

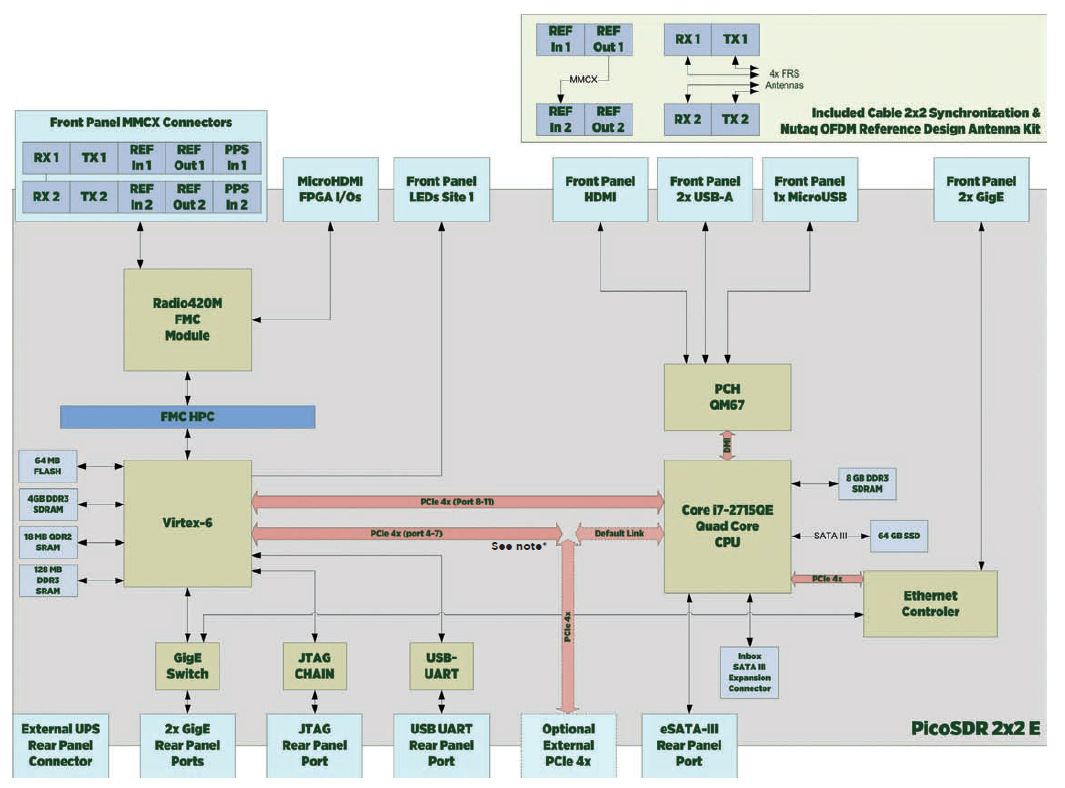
The PicoSDR2x2E block diagram shown below describes how all the peripherals interconnect with the embedded CPU (Quad-Core CPU) and FPGA (Virtex-6).

Since GNURadio_Radio420_PCIe_sx315.bit uses the PCI Express Bus to interface between the embedded PC and carrier board's FPGA (Virtex-6), install the PCI Express Driver on the embedded PC:

cd /opt/Nutaq/ADP6/ADP_MicroTCA/sdk/PCIe/driver/host
sh make-modules.sh
sh setonpc.sh

If the embedded PC is restarted then setonpc.sh must be excuted again

Launch demo scripts

Now the system is ready to build and run the demo application. Navigate to the demo project directory:

cd /opt/Nutaq/ADP6/ADP_MicroTCA/sdk/examples/perseus6010_radio420x_rtdex_record_playback/host/prj_linux
sh build_demo.sh

Run the demo file:

sh Launch_radio420x_rtdex_record_playback.sh

Choose the appropriate option to run.

Choose the data path:
 - Type '0' to execute passthrough (data looped from ADC to DAC in the FPGA)
 - Type '1' to output DDS signal (generated in the FPGA)
 - Type '2' to execute a data record
 - Type '3' to execute a data playback
 - Type '4' to stream data to the host
 - Type '5' to stream data from the host

From here you can use a nearby USRP node on the grid for signal generation / verification. Please refer to this tutorial for instruction on using USRPs.

Last modified 9 years ago Last modified on Oct 9, 2015, 4:29:12 PM

Attachments (1)

Download all attachments as: .zip

Note: See TracWiki for help on using the wiki.